
Today we have a guest post from Dave Goldberg. Dave is an embedded software engineer based in Boston, MA. He enjoys problem solving, mentoring junior engineers, and preaching the importance of quality and security. You can find Dave on LinkedIn.
In this article we’ll investigate how a particular Wi-Fi connected sensor (in this case a radon sensor) communicates with “the cloud” and how we can use that knowledge to reduce our reliance on third-party servers. There are two reasons why we might want to do this: (1) to gain programmatic access to the data when the manufacturer doesn’t provide an API, and (2) to continue using the device if the company goes out of business or decides to shut down their servers.
Table of Contents:
- Who is the sensor talking to and how?
- What is DNS?
- What is TLS?
- Replacing Their Servers With Our Own
- Doing Something With the Data
- Wrapping Up
Who is the sensor talking to and how?
I started by capturing and analyzing the traffic between the device and the server. I connected the device to a Wi-Fi access point (AP) where I could run tcpdump to capture all of the network traffic. Here is an interesting snippet of the capture as displayed in Wireshark.

First there is a DNS (Domain Name System) query for the server address then an answer to the query.

Next is a TLS handshake between device (client) and server to establish an encrypted data session.

Finally we see the TLS encrypted application data.

If the data was sent in plaintext, then we could simply monitor the device’s traffic and pull what we want from it. Since it is encrypted, we need to try something else.
First, we’ll explore the two types of network traffic we identified, DNS and TLS, then we’ll try to find a vulnerability we can exploit.
What is DNS?
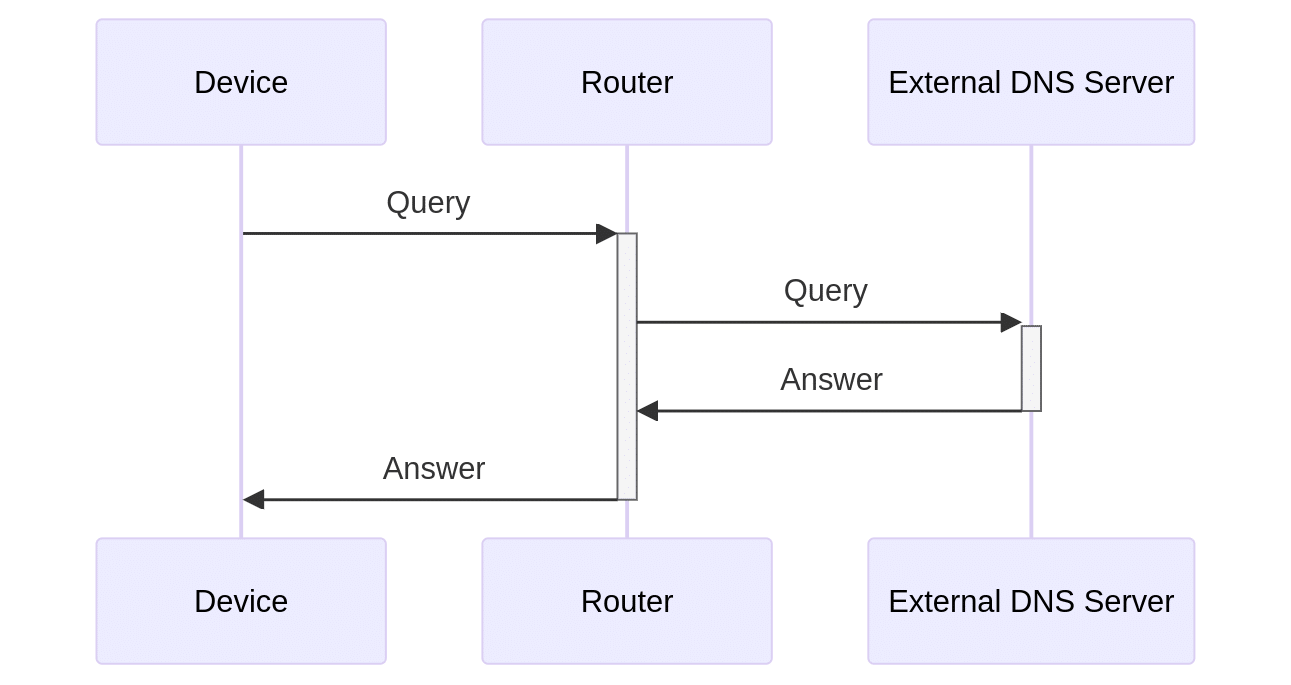
Domain Name System (DNS) servers translate domain names to IP addresses. The full DNS ecosystem is complex. Fortunately, we only need to look at what happens to a DNS request before it gets to a “real” DNS server. Some devices explicitly set their DNS server address (popular examples include 1.1.1.1 or 8.8.8.8), but often devices will query their local network’s gateway, which then forwards the query. This is why, in our example, we see the device (192.168.8.133) query the AP (192.168.8.1). Gateways can be configured to use a DNS server of the administrator’s choice, but a typical home network will use the default provided either by the purchased router or the ISP. A DNS query and response on a simple network looks like this:
A popular method for blocking ads is using a local DNS server like Pi-Hole, AdGuard Home, or Blocky. These servers use blocklists to prevent queries for known advertisement-serving URLs from resolving, while forwarding allowed queries to “real” DNS servers. This prevents the advertisement from loading. By configuring your gateway to use your local ad-blocking DNS server, every device on your network will use your local server unless that device is explicitly configured otherwise.
This is what DNS queries look like on my home network:

What is TLS?
Most website traffic these days is encrypted via TLS (Transport Layer Security). TLS is in play when you have URLs that start with “https” and see the little lock symbol next to the address bar of your web browser. Securely communicating with a server starts with a TLS handshake. The handshake securely exchanges a secret key that can be used to encrypt data between the client and the server.
The handshake also gives the server an opportunity to present its “certificate.” This should be used to establish trust of the server, ensuring that the server is who it claims to be and is vetted by a mutually-trusted entity. But maintaining the appropriate chains of trust on an embedded device is difficult. Certificates expire and require secure replacement, and working with TLS during development hinders debugging. Often, developers take shortcuts to make their own lives easier.
For more on certificate chains of trust, see: https://www.keyfactor.com/blog/certificate-chain-of-trust/
Replacing Their Servers With Our Own
What if this device doesn’t correctly verify the server certificate? Could we pretend to be “the cloud” and have the device talk to our own server instead?
To test this hypothesis we need a web server and a way to answer the DNS query for the server URL the device is trying to talk to with the IP address of our custom server.
For the web server, I asked ChatGPT to build me a simple web application in Python that would handle TLS connections. AI is imperfect, so after some editing I have this very simple web application that will show us how the device is trying to send data.
import http.server
import ssl

# Define an empty request handler
class SimpleHandler(http.server.SimpleHTTPRequestHandler):
    pass

# Set up the server
server_address = ('0.0.0.0', 443)
httpd = http.server.HTTPServer(server_address, SimpleHandler)

# Create SSL context and load the certificate
context = ssl.SSLContext(ssl.PROTOCOL_TLS_SERVER)
context.load_cert_chain(certfile='server.pem')

# Wrap the server's socket with SSL
httpd.socket = context.wrap_socket(httpd.socket, server_side=True)

# Start the server
print("Serving...")
httpd.serve_forever()
Next, we need to generate a certificate for the server. The command below will generate a “self-signed” certificate. This certificate wouldn’t be trusted by any rational actor, but we’re hoping that the device won’t care!
openssl req -new -x509 -keyout server.pem -out server.pem -days 365 -nodesFinally, we need to control how the server URL is resolved. I use Blocky on my network as an ad blocker. Blocky supports custom DNS mapping, so we can tell it to resolve a DNS query for a certain URL to the IP address of our choosing. In this case, we tell Blocky to respond to a query for api.cloud.ecosense.io with the server’s IP on the local network.
Now that the DNS query is answered with the IP of our local server, we get traffic to our local web server from the device!
Serving...
192.168.8.133 - - [03/Oct/2024 16:36:10] code 501, message Unsupported method ('PUT')
192.168.8.133 - - [03/Oct/2024 16:36:10] "PUT /api/v2/radon HTTP/1.1" 501 -
In the server output, we see that the device is making a PUT request. If the device was validating the server certificate, it wouldn’t make it this far, so that shows that our certificate was accepted. Let’s add a handler for the PUT request and print out any data we receive.
# Define a basic request handler
class SimpleHandler(http.server.SimpleHTTPRequestHandler):
    def do_PUT(self):
        content_length = int(self.headers['Content-Length'])
        body = self.rfile.read(content_length)
        print(body)
        self.send_response(200)
The next PUT request shows a comprehensive data dump:
{
   "serial_number":"XXXXXXXXXX",
   "d_type":0,
   "p_time":17180,
   "d_status":2,
   "radon_level":61,
   "radon_dou":28,
   "d_debug":{
      "FW_MODE":0,
      "PUT_CNT":1832,
      "PUT_ERR":13,
      "PUT_STS":4,
      "PUT_T":10,
      "D_RE":1,
      "F_RE":0,
      "OTA_CHK":"0000",
      "W_RECONN":0,
      "IP_L_CNT":0,
      "SEND_S_TS":1031103719,
      "SEND_E_TS":1031105887,
      "ERR_7004_LEN":125,
      "ERR_7004_1":0,
      "ERR_7004_2":0,
      "ERRORS":[
         {
            "cmd":"00ca",
            "sts":9,
            "ts":3625523641
         },
         {
            "cmd":"00ca",
            "sts":9,
            "ts":126702
         }
      ]
   },
   "c_factor":1.13,
   "fw_version":"1.09.A"
}
Doing Something With the Data
Luckily, the most important data is clearly labeled, and we can ignore the more nebulous items. Interpretation of the data is left up to us, but we can often use logic to deduce the appropriate units. For example, based on what I expect to see in my space, the captured radon_level is being reported in becquerels per cubic meter (Bq/m3).
The next step is pushing this data to a suitable logging/reporting system, but that is a project for another day.
Wrapping Up
We accomplished our goal of reducing our reliance on “the cloud.” We also learned a couple lessons about security:
- Every step is important!
- Encrypting traffic is great, but communications can still be insecure if they’re getting sent somewhere other than the expected receiver. Especially with resource-constrained embedded devices, getting security right is challenging and it is tempting to take short cuts.
- DNS can be a privacy issue!
- Your network administrator, your ISP, your VPN provider – they can all see your DNS traffic which means they can monitor and log the websites you are visiting. Encrypting DNS traffic is possible using either DNS over TLS (DoT) or DNS over HTTPS (DoH), though these methods are often not enabled by default.
You write: we’re hoping that the device won’t care!
What if device cares? and I cannot install a new CA into the device?
Is the code for this published anywhere? Also curious what ecosense device this is for?
Damn neat, I was coming at it from the other side to figure the requests the app client was making but of course there is better cert validation on that end. This is smarter and more realtime. Only issue is when ecosense decides to patch the firmware though its not like java based set top boxes have not stopped working because their burnt into the ROM trust cert chain expired 😀
That is beautiful, I was coming at it from the other end of trying to get the requests the client app is making but of course that has better certificate validation. The only issue is that what if ecosense decides to patch the firmware on the device to require certificate matching then this sadly goes out the window.