
Today we have a guest post from Kayode Alade. Kayode is an IoT Solutions Architect with a knack for making things work. He considers himself a perpetual learner, always enthusiastic about acquiring new knowledge, whether from an engineering perspective or a business standpoint.
You can find Kayode on GitHub and LinkedIn.
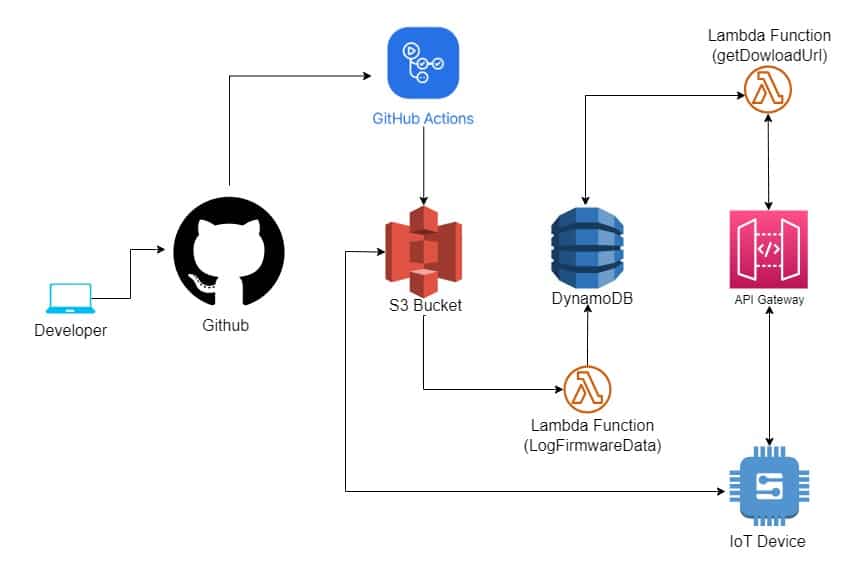
Embedded DevOps is changing how Embedded teams build software and push updates to customer devices. In the ever-evolving landscape of IoT, companies like Golioth and Memfault are pioneering efforts to streamline device management. From seamless provisioning to over-the-air (OTA) updates, their advancements are reshaping how we interact with connected devices. For many Engineers, these processes might look like an overkill but to ensure the success of IoT deployments, it’s important to ship software to customer devices in a fast, efficient and reliable way. In this article, you will learn how to build a serverless CI/CD workflow using Github Actions, AWS tools and ESP-IDF framework. Our approach will be a device to cloud approach, that is we set up the firmware aspect on the device and then integrate with the cloud infrastructure.
Setting up ESP-IDF in Visual Studio Code
The Espressif IoT Development Framework(ESP-IDF) is a robust development framework for developing solutions using the ESP32. It is intended for development of Internet-of-Things (IoT) applications with Wi-Fi, Bluetooth, power management and several other system features.
The ESP-IDF easily integrates with Visual Studio Code (VSCode) so we will use VSCode as our IDE of choice.
While the application code makes up the most crucial part of the device-side setup, the CMakeLists.txt file plays a significant role in guiding the project’s build process, integrating components, and defining essential configurations. The project version variable helps build the project version number into the code and this serves as an identifier for the current device firmware version. To ensure accurate version checking and facilitate firmware updates, it is essential to increment the version number for every releasable build.
cmake_minimum_required(VERSION 3.5)
set(EXTRA_COMPONENT_DIRS
    $ENV{IDF_PATH}/examples/common_components/protocol_examples_common)
include($ENV{IDF_PATH}/tools/cmake/project.cmake)

# Use execute_process command to get version information from Git
execute_process(
    COMMAND git describe --tags
    WORKING_DIRECTORY ${CMAKE_SOURCE_DIR}
    OUTPUT_VARIABLE GIT_VERSION
    OUTPUT_STRIP_TRAILING_WHITESPACE
    ERROR_QUIET
)

# Check if Git command was successful
if(NOT GIT_VERSION)
    # Set default values if Git is not available or command failed
    set(BUILD_TAG "default")
    set(BUILD_INFO "")
    message("Git command failed: ${GIT_ERROR}")
    return()
endif()

string(REPLACE "-" " " VERSION_LIST ${GIT_VERSION})
list(GET VERSION_LIST 0 BUILD_TAG)

# Print the version information
message("Build tag: ${BUILD_TAG}")
set(PROJECT_VER ${BUILD_TAG})
string(REPLACE "." "_" FILE_VER ${BUILD_TAG})
set(FILE_NAME "firmware_esp32_${FILE_VER}")
project(${FILE_NAME})
The version number is dynamically fetched from Git tags using the git describe command. This allows seamless integration of the project version, enhancing automation and reducing manual effort. The obtained version, stored in the BUILD_TAG variable, is used to construct the firmware filename.
Device-side update support
A resilient CI/CD pipeline is only as robust as its ability to orchestrate updates on the device side. The efficacy of a serverless OTA workflow hinges on the intricate alignment between the cloud infrastructure and the IoT devices it governs. This aspect encompasses the mechanisms by which devices query the backend, determine whether an update is needed, and download the update. To invoke the OTA process, the device establishes a connection with the backend using an HTTP query. The query contains the current version running on the device. This helps the device confirm if there is a new update available for download. The device uses the esp_ota_ops library to extract the currently installed firmware version. This library provides a set of operations for managing firmware updates on ESP32 devices, including retrieving the current version while the esp_http_client library helps to manage HTTP events, ensuring a robust and reliable interaction between the device and the backend.
extern const uint8_t ClientCert_pem_start[] asm("_binary_certificate_pem_start");
extern const uint8_t ClientCert_pem_end[]   asm("_binary_certificate_pem_end");
static const char *TAG = "OTA-UPDATE";

static void client_post_rest_function() {
    esp_app_desc_t running_app_info;
    if (ESP_OK ==
        esp_ota_get_partition_description(
            esp_ota_get_running_partition(), &running_app_info)
        )
    {
         char complete_url[256];
        snprintf(complete_url,
            sizeof(complete_url),
            "https://stgquzvr3h.execute-api.us-east-2.amazonaws.com/dev/firmwares?rawVersion=%s",
            running_app_info.version);

        esp_http_client_config_t config_get = {
            .url = complete_url,
            .method = HTTP_METHOD_GET,
            .cert_pem = (const char *)ClientCert_pem_start,
            .event_handler = client_event_get_handler
        };

        esp_http_client_handle_t client = esp_http_client_init(&config_get);
        esp_err_t err = esp_http_client_perform(client);
        if (err == ESP_OK)
        {
            ESP_LOGI(TAG, "HTTPS GET request successful");
        }
        else
        {
            ESP_LOGE(TAG, "HTTPS GET request failed");
        }
        esp_http_client_cleanup(client);
    }
    else
    {
        ESP_LOGE(TAG, "Failed to get the running firmware info");
    }
}
Once there is a need for an update, a URL is returned to the device. This URL is used to download the latest firmware version. If no new update is available, the device continues its normal operation.
void ota_task(const char *otaURL) {
    printf("OTA URL: %s\n", otaURL);

    // Check if the URL starts with "https://"
    if (strstr(otaURL, "https://") == NULL)
    {
        ESP_LOGE(TAG, "Response does not contain 'https://': %s", otaURL);
        printf("RES: Update cannot be done. Invalid URL!\n");
    }
    else
    {
        perform_https_ota(otaURL);
    }
}
Serverless Infrastructure Setup
The concept of “serverless” allows developers to focus more on writing code while the cloud provider manages the infrastructure, automatically scaling resources as needed. We will use services available on AWS to set up the infrastructure. The entire OTA cloud workflow will be provisioned using the Serverless framework. Since this project makes use of AWS tools, owning an AWS account is a prerequisite to ensure everything works properly. Create an AWS account and create a user with programmatic access that will enable you to provision cloud infrastructure on AWS.
Clone the repository for this project and install all the dependencies via the terminal using:
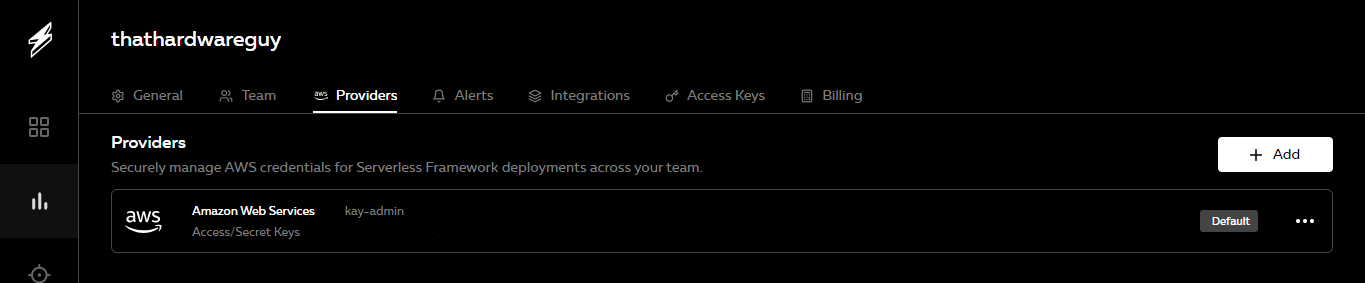
npm installOnce the dependencies are installed, create a serverless account here. The access ID and keys should be used to setup provider settings to allow the serverless framework to have access to your AWS account for infrastructure deployment purposes.
We will use a serverless.yml file to orchestrate the deployment of the serverless infrastructure.
org: thathardwareguy
app: cicd-serverless-app
service: cicd-serverless-app

plugins:
  - serverless-webpack
  - serverless-iam-roles-per-function

provider:
  name: aws
  runtime: nodejs16.x
  stage: ${opt:stage, 'dev'}
  region: ${opt:region, 'us-east-2'}

  environment:
    PROJECT_NAME: secure-ota-cicd
    FIRMWARE_TABLE: firmware-builds3-${self:provider.stage}
    S3_BUCKET_NAME: esp32-cicd-firmwares-${self:provider.stage}

functions:
  # configuire write s3 event to dynamoDB lambda
  LogFirmwareData:
    handler: lambda/firmwareData.handler
    events:
      - s3:
          bucket: !Ref AttachmentsBucket
          event: s3:ObjectCreated:*
          rules:
            - suffix: .bin
          existing: true
    iamRoleStatementsName: ${self:provider.environment.PROJECT_NAME}-firmware-data-role-${self:provider.stage}
    iamRoleStatements:
      - Effect: Allow
        Action:
          - dynamodb:PutItem
        Resource: arn:aws:dynamodb:${self:provider.region}:*:table/${self:provider.environment.FIRMWARE_TABLE}
  GetDownloadUrl:
    handler: lambda/getDownloadUrl.handler
    events:
      - http:
          method: get
          path: firmwares
          cors : true

    iamRoleStatementsName: ${self:provider.environment.PROJECT_NAME}-get-download-url-role-${self:provider.stage}
    iamRoleStatements:
      - Effect: Allow
        Action:
          - dynamodb:Query
        Resource: arn:aws:dynamodb:${self:provider.region}:*:table/${self:provider.environment.FIRMWARE_TABLE}

resources:
  Resources:
    FirmwareTable:
      Type: AWS::DynamoDB::Table
      Properties:
        AttributeDefinitions:
          - AttributeName: deviceType
            AttributeType: S
        KeySchema:
          - AttributeName: deviceType
            KeyType: HASH
        BillingMode: PAY_PER_REQUEST
        TableName: ${self:provider.environment.FIRMWARE_TABLE}

    AttachmentsBucket:
      Type: AWS::S3::Bucket
      Properties:
        BucketName: ${self:provider.environment.S3_BUCKET_NAME}
        CorsConfiguration:
          CorsRules:
            - AllowedOrigins:
                - '*'
              AllowedHeaders:
                - '*'
              AllowedMethods:
                - GET
                - PUT
                - POST
                - DELETE
                - HEAD
              MaxAge: 300
        PublicAccessBlockConfiguration:
          BlockPublicAcls: true
          IgnorePublicAcls: true
          BlockPublicPolicy: true
          RestrictPublicBuckets: true
    BucketPolicy:
      Type: AWS::S3::BucketPolicy
      Properties:
        PolicyDocument:
          Id: MyPolicy
          Version: '2012-10-17'
          Statement:
            - Sid: PublicReadForGetBucketObjects
              Effect: Deny
              Principal: '*'
              Action: 's3:GetObject'
              Resource: 'arn:aws:s3:::${self:provider.environment.S3_BUCKET_NAME}/*'
        Bucket: !Ref AttachmentsBucket
The setup includes two pivotal Lambda functions, which serves as the backend infrastructure running on AWS:
LogFirmwareData: This function captures and logs firmware-related data (file name, firmware version, etc.) into DynamoDB. It responds to S3 events, specifically triggered when new firmware binaries (.binfiles) are added to the specified S3 bucket. The associated IAM role ensures the Lambda has the permissions to execute DynamoDB operations.GetDownloadUrl: Responsible for generating and serving download URLs for firmware updates, this function responds to HTTPGETrequests at the/firmwares endpoint. It leverages DynamoDB for querying firmware data and returning the appropriate download link.
Navigate to the backend directory and use the sls command to deploy the lambda functions. You should get similar output when the command is invoked:
sls
Running “serverless” from node_modules
The “app” in this service does not yet exist in your Organization.
? What would you like to do? Create ‘cicd-serverless-app’ in ‘thathardwareguy’ org
✓ Your project is ready to be deployed to Serverless Dashboard (org: “thathardwareguy”,app: “cicd-serverless-app”)
? Do you want to deploy now? Yes

Deploying cicd-serverless-app to stage dev (us-east-2, “kay-admin” provider)
Packaging (0s)
[Webpack] Building with webpack
Once the resources are deployed successfully, you will get an output containing the url that the device can use to query the backend.
✓ Service deployed to stack cicd-serverless-app-dev (145s)

Dashboard: https://xxxx/apps/cicd-serverless-app/cicd-serverless-app/dev/us-east-2
Endpoint:GET - https://xxxx.execute-api.us-east-2.amazonaws.com/dev/firmwares

functions:
    LogFirmwareData: cicd-serverless-app-dev-LogFirmwareData (4.1 MB)
    GetDownloadUrl: cicd-serverless-app-dev-GetDowmloadUrl
Setting Up Github Actions
The aim of setting up a CI/CD OTA workflow is to ensure that new features are continuously pushed to customer devices as soon as they are available. This is only possible if a build can be triggered automatically when new code is pushed. This system uses GitHub as the repository and versioning system of choice and GitHub Actions CI/CD to automate our build and also deploy the compiled firmware to the S3 bucket. In order to build the project, we will use the ESP-IDF action available here. The workflow that triggers the build can be created by setting up a .github/workflows directory in your project’s root and adding YAML files with your desired workflow configurations. Each YAML file defines specific jobs, such as build and test tasks, and is placed in the .github/workflows directory. The project you cloned earlier already has a workflow setup.
Github Actions requires a YAML file that activates the build based on triggers configured.
name: Serverless CICD
on:
  push:
    tags:
      - 'v*.*.*'
  workflow_dispatch:
jobs:
  build:
    runs-on: ubuntu-latest

    steps:
      - name: Get latest release version number
        id: get_version
        uses: battila7/get-version-action@v2

      - name: Convert Version Format
        id: convert_version
        run: |
          version="${{ steps.get_version.outputs.version }}"
          ver="${version//./_}"
          echo "Formatted Version: $ver"
          echo "::set-output name=formatted_version::$ver"

      - name: Install ESP-IDF and Build project
        uses: rmshub/esp-idf-action@v5
        with:
          esp_idf_version: v4.4.4
          esp_idf_target: esp32

      - name: Archive build output artifacts
        uses: actions/upload-artifact@v3
        with:
          name: build
          path: |
            ./build/firmware_esp32_${{steps.convert_version.outputs.formatted_version}}.bin
      - name: Upload file to bucket
        uses: zdurham/s3-upload-github-action@master
        Env: FILE: ./build/firmware_esp32_${{steps.convert_version.outputs.formatted_version}}.bin
          AWS_REGION: 'us-east-2'
          S3_BUCKET: ${{ secrets.S3_BUCKET_NAME}}
          AWS_ACCESS_KEY_ID: ${{secrets.AWS_KEY_ID}}
          AWS_SECRET_ACCESS_KEY: ${{secrets.AWS_SECRET_ACCESS_KEY}}
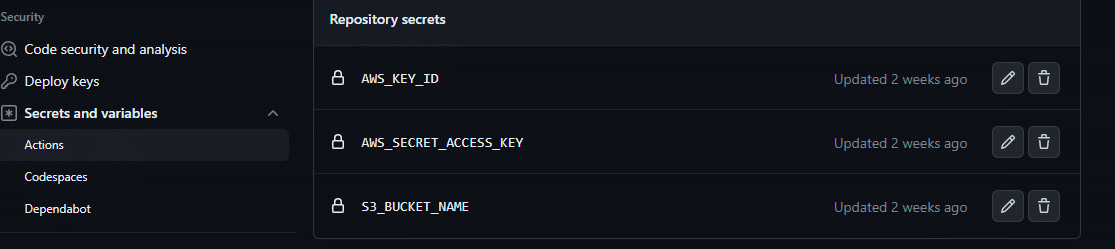
You also need to configure secrets for authentication when deploying the compiled project to the S3 bucket.
To trigger a build, the workflow is activated when a new tag is pushed to GitHub.
git add .
git commit -m ‘Edit: Change Connection string’
[main 58604ce] Edit: Change Connection string
1 file changed, 2 insertions(+), 2 deletions(-)
git tag v1.4.8
git push origin main --tags
Enumerating objects: 38, done.
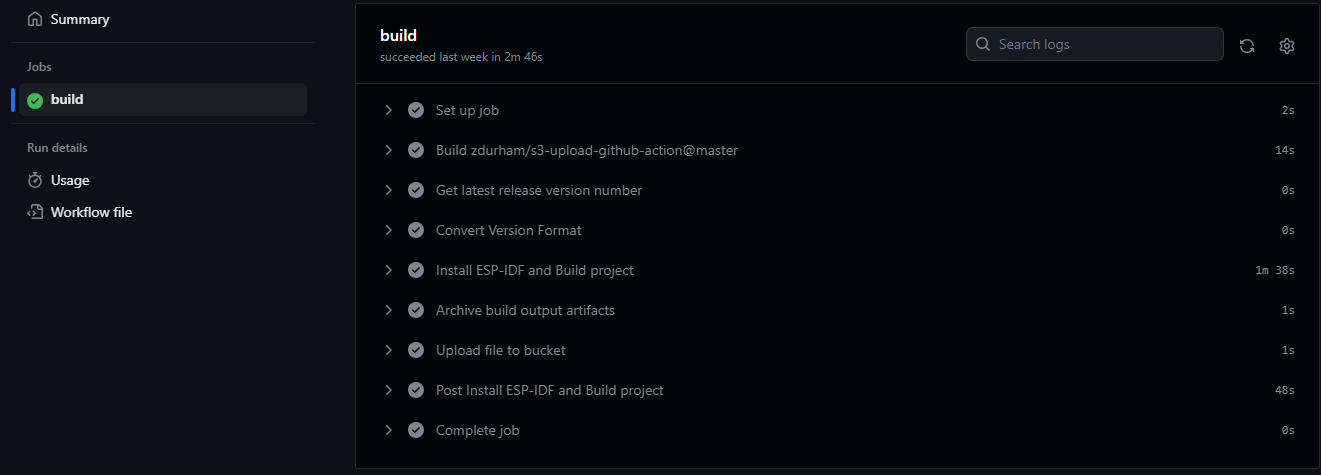
Counting objects: 100% (38/38), done.Click the Actions tab at the top of your repo and you should see the workflow running
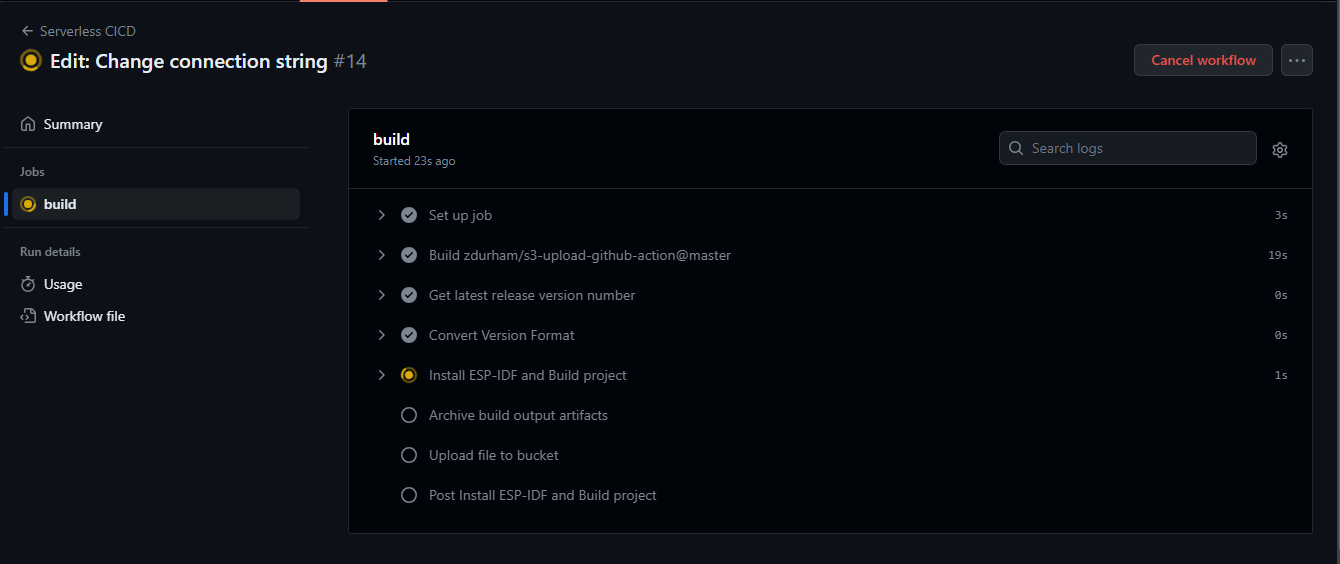
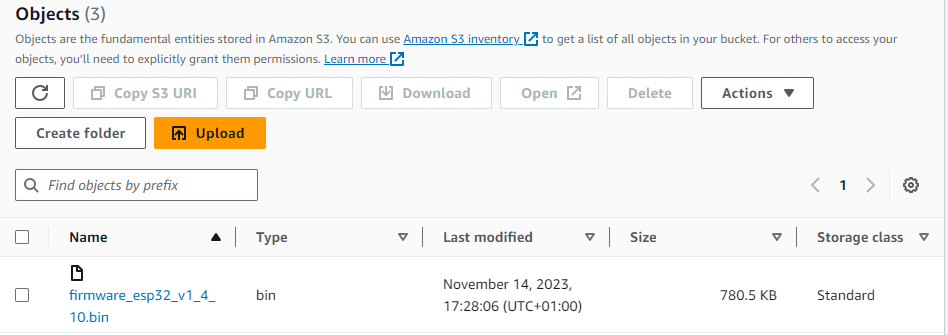
When the build process completes successfully, the file is successfully deployed to the S3 bucket where the device can download it.
The .bin file, which is the output of the project build, is shown in the S3 bucket below.
Device OTA Test
To test the proper working operation of the code, change the version of the project by creating a new tag using the git tag command:
git tag v1.4.9Compile and upload the code to your ESP32. Once that is done, create a git tag with a higher version number and push it to your repository. Plug in your ESP32 and you should get an output similar to this:
Client HTTP_EVENT_ON_DATA: {“Response”:https://xxxxxxxxxxxx.amazonaws.com/firmware_esp32_v1_4_10.bin”}
I (7468) OTA-UPDATE: HTTPS GET request successful
Extracted URL: https://xxxxxxxxxxxx.amazonaws.com/firmware_esp32_v1_4_10.bin
OTA URL: https://xxxxxxxxxxxx.amazonaws.com/firmware_esp32_v1_4_10.bin
I (12468) esp_https_ota: Writing to partition subtype 16 at offset 0x110000
(12488) OTA-UPDATE: Running firmware version: v1.4.9
I (86218) esp_image: segment 0: paddr-00110020 vaddr=3f400020 size-1adbch (110012) map
I (86258) ́esp_image: segment 1: paddr=0012ade4 vaddr=3ffb0000 size-038d8h ( 14552) I (86258) esp_image: segment 2: paddr=0012e6c4 vaddr=40080000 size=81954h ( 6484)
I(86268)esp_image: segment 3: paddr=00130020 vaddr=400de020 size=8fd98h (589288) map
I(86458) esp_image: segment 4:paddr=001bfdc0 vaddr=40081954 size=133e0h (78816)
I(86498) esp_image: segment 0: paddr-00110020 vaddr=3f400020 size-1adbch (110012) map
I (86538) esp_image: segment 1: paddr=0012ade4 vaddr=3ffb0000 size-038d8h ( 14552) I (86538) esp_image: segment 2: paddr=0012e6c4 vaddr-40080000 size-01954h ( 6484)
I (86548) esp_image: segment 3: paddr-00130020 vaddr-400d0020 size-8fd98h (589208) map
I (86738) esp_image: segment 4: paddr=001bfdc0 vaddr=40081954 size-133e0h ( 78816)
I (86848) OTA-UPDATE: ESP_HTTPS_OTA upgrade successful. Rebooting…
I (87848) wifi:state: run -> init (0)
I (87848) wifi:pm stop, total sleep time: 54048973 us / 86176568 us
The output shows the current version (v1.4.9 above) and the response from the server. The file that is present in the S3 bucket is v1.4.10. After a successful update, the device reboots automatically. If it makes an update check again, the backend returns a “Device is up to date” response since the current version matches what is available in the S3 bucket.
I (6275) wifi:<ba-add>idx:0 (ifx:0, 9a:74:da:c6:3b:35) tid:0, ssn:18, winSizw
Client HTTP_EVENT_ON_DATA: {“Response”: “Device up to date”}”
I [6626] OTA-UPDATE: HTTPS GET request successful
Conclusion
This tutorial has covered how we can integrate a serverless architecture to achieve seamless OTA updates on IoT devices. This is only a starting point. A production system needs to consider additional capabilities, like resumable downloads, staged rollouts, and security. The next tutorial will cover:
- Integrating custom scripts that will support project compilation using GitHub Actions for different boards.
- The use of pre-signed urls and private keys directly on different to make the OTA update process more secure.
- Incorporate AWS IoT jobs and MQTT to eliminate the request response cycle that HTTP uses, thus ensuring a more efficient way of checking for updates.