
Today we have a guest post from Mathias Schulte. Mathias is a member of the development team at YAKINDU. He likes trying out different tools and languages in order to improve his engineering skills.
Implementing an IoT solution can easily become a complex task. IoT applications usually consist of three parts:
- a device, often an embedded one, that runs some kind of business logic,
- a mobile or web app that shows the state of the device and allows the user to control it, and
- the communication protocol between (1) and (2).
Implementing our business logic is only one small part of the story. Luckily, there are many platforms, tools and frameworks out there that make our work more efficient and enable us to spend more time focused on the business logic. This is especially helpful when implementing the first running prototype, since we don’t want to get lost in all those details.
In this article, I want to present a set of tools that helped me to get off the ground quickly when putting my ideas into code. I will use a simple example of a connected oven to demonstrate how model-based development in the form of state machines can be used in conjunction with an AWS-hosted MQTT broker to quickly convert an idea into a running prototype.
The Plan
Our connected oven will be able to heat up and cool down, targeting a temperature that can be set via an app. This should be enough logic for our initial prototype. I chose Python for my target language, because we can leverage all kinds of libraries, it is simple to use, and it can be put onto a Raspberry Pi to finalize this project. The prototype app that controls the oven and shows the current temperature will be also written in Python.
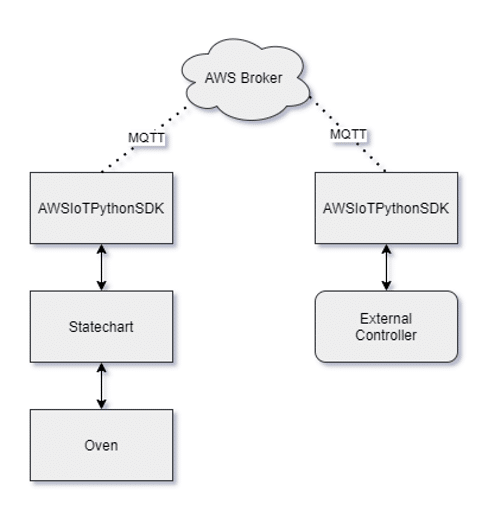
The oven and the app are supposed to communicate with each other over the internet via the MQTT protocol. In order to have a more realistic setup than just running an MQTT broker locally, I chose to get my hands dirty with Amazon Web Services (AWS). AWS is a comprehensive suite of various tools for software development, but for my project the AWS IoT core is more than enough. It allows me to create a simple device and get the broker running, which then listens and sends MQTT messages.
The next tool I wanted to use was a statechart modeling tool. The idea is to define the oven logic as a state machine. In order to do so, I used YAKINDU Statechart Tools which is free to use for non-commercial projects.
A statechart modeling tool is used to create diagrams of states and transitions, which model the behavior of your system.
What’s great about statecharts is that they are pretty descriptive and therefore almost self-explanatory. For those who are unfamiliar with them, here is a brief introduction to the vocabulary and interpretation of the diagram:
- The black circle is the entry to the statechart, the rounded rectangles represent the states, and the arrows are called transitions.
- During execution, the statechart reacts to incoming events and evaluates if a state change needs to occur.
- The conditions for a state change are defined on the transition arrows in the form of reactions. A reaction has the syntax “trigger [guard] / actions” with the meaning: If the trigger occurs and the guard condition is true, then execute the actions, and in case of a transition, perform the state switch.
If you want to learn more about the semantics of state machines, Yakindu has an online tutorial where you can play around with live statecharts.
The Execution
I started with the state machine that describes the oven behavior. Modeling the oven behavior was intuitive, since I could just draw a state machine for the behavior I had in mind. The idea is that the oven gets a target temperature (either sent or set with a regulator) and then increases the temperature until it reaches the desired point and then switches to cooling, which works the same way.
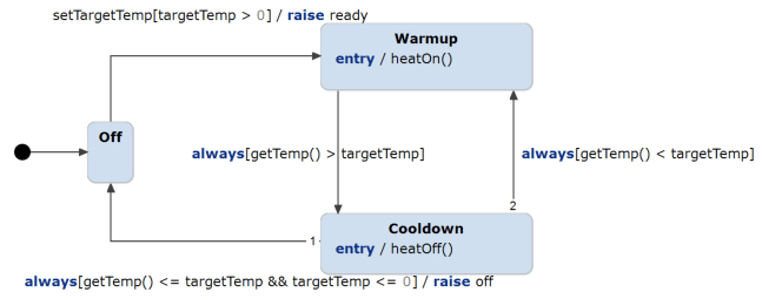
As you can see, it’s rather simple, but that is to be expected: the more complex behavior is supposed to go into the controller.
After that, I generated Python code from this statechart. The tool I used for modelling (YAKINDU Statechart Tools) can convert the diagram into equivalent Python code, which saved me some time coding it up myself and also left me with a nice diagram to show here.
If you are wondering what the functions do, I will get to that a bit later, but for now, they just get turned into empty callbacks which I can then fill with oven control functions.
Next, I needed to set up AWS, and in particular the MQTT broker. For anyone who has not done this yet, you can set up an IoT device on the AWS IoT page and then do some configuration with the help of their documentation.
In order to connect to the AWS MQTT broker, I needed to subscribe to the topic that I created online for the oven. I also needed to create a callback function that handles incoming MQTT messages and translates them into events on the state machine. In this callback (source code), I raise the setTargetTemp event of the state machine. This event is used to set the temperature remotely.
I also created a callback class (source code) that contains all the functions that I previously referenced in the state machine diagram. These callbacks call corresponding functions in the oven controller.
Finally, I needed to implement support for the oven output. I created two Observer classes (source code) that inherit the next method This function gets called every time the state machine raises an out-event. In this case, I wanted the state machine to publish updates to AWS. This allows us to see remotely when the oven is heated up or cooled down.
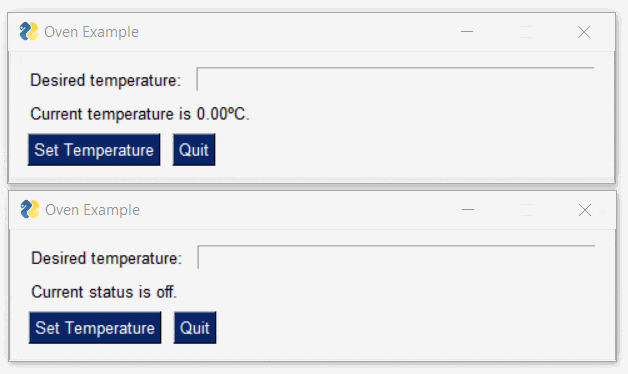
The result: it works! I created two GUI applications, one working directly on the state machine code (think of it as setting the temperature by hand on your oven), and one that is connected to the oven via MQTT. In that way, I can simulate interactions from either an app or in-person controller. Each of those programs can now set the target temperature and the local one also displays the current oven temperature.
Here is a small GIF of both programs running:
It Works, BUT…
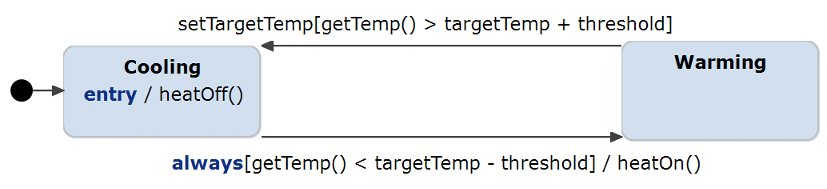
It would not be good for an actual oven to keep turning it off and on again 60 times per second, so there is more work we can do, such as adding hysteresis. Basically, I want to add a little buffer to give the oven some more time between switching on and off.
There is also the ready event, which does get called on startup, but is an oven really ready once I turn it on? Of course not! I need to distinguish between turning on, reaching the desired temperature, and holding the current temperature.
To handle these details, I added another state to the state machine, which is called “ready” and contains a little sub-diagram that implements the hysteresis. This also solves the problem of the ready event, since the state machine is always ready when it enters the ready state.

The nice thing is that I do not have to change any code myself, since I can just change the statechart and simply generate the python code again. No time wasted rewriting the code!
And as one can see, the state machine works much better now and actually calls the ready event at appropriate times!

Closing remarks
The steps needed to get this project off the ground were pretty easy and the tools really helped me. Once I became familiar with the AWS configuration, it was easy to create new topics for my MQTT messages. Also, using a modeling tool for implementing the oven logic helped me to focus on the desired behavior and not get lost in implementation details. Having a statechart diagram at hand makes it easier to identify faulty or missing behavior. Using code generation speeds up the whole process of updating the system with new behaviors. It was fun realizing this project and getting used to the involved tools.
What modelling tool did you use for this project?
The modelling tool used in this project is YAKINDU Statechart Tools, which you can find under this link: https://www.itemis.com/en/yakindu/state-machine/