
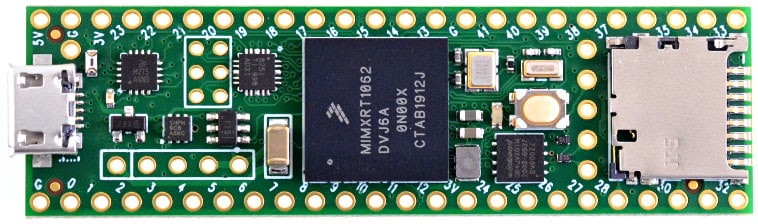
We fell in love with the powerful and cheap Teensy platform after using the Teensy 3.6 for a client project. PJRC remains hard at work, and the Teensy series keeps getting better and better.
We are quite impressed by the capabilities of this tiny little development board. It is extremely affordable, the processor is one of the fastest microcontrollers that is currently available, and it provides USB host support. This board is also accessible to beginner embedded developers thanks to the Teensyduino effort. The Teensy 4.1 is a great intermediate-level development board, especially if you are interested in transitioning away from the Arduino ecosystem. It provides additional peripherals and memory capabilities over the Teensy 4.0. Due to the processing speed and RAM size, this is a great option for those of you looking to play around with ML on embedded systems.
Table of Contents:
- The Teensy Lineup
- Teensy 4.1 Specs
- Programming the Board
- Teensyduino
- Libraries
- Documentation and Tutorials
- Purchasing
- Further Reading
The Teensy Lineup
The Teensy 4.1 development board is merely one in a family of Teensy boards produced by PJRC, including the Teensy 3.6 and Teensy 4.0 boards that we previously reviewed. Their development kits feature both 8-bit AVR and 32-bit ARM Cortex-M processors. Each Teensy version differs in size, performance level, and whether or not an SD slot is included.
When we purchased the development kit, the Teensy 4.1 and Teensy 4.0 were the highest performing boards in the family, with the Teensy 4.1 providing additional pins and interfaces.
Teensy 4.1 Specs
The Teensy 4.1 sports impressive specs in a small package (2.4″ x 0.7″) and at a low cost ($26.85 at the time of purchase). This board is about the same price as an Arduino Uno and cheaper than an Arduino Mega, while providing much higher performance than both platforms.
The primary specifications are shared with the Teensy 4.0, with some improvements in available pins and connections:
- 600 MHz Cortex-M7 processor (NXP iMXRT1062)
- PJRC notes that the processor can be overclocked beyond 600 MHz
- FPU
- 32 general purpose DMA channels
- 35 PWM pins (c.f. 31 on Teensy 4.0)
- 40 digital pins, all interrupt capable
- 18 analog pins (c.f. 14 on Teensy 4.0), 2 ADCs on chip
- Peripherals for: USB, SDIO, Serial, S/PDIF digital audio, I2S digital audio, I2C, SPI, cryptographic acceleration, RNG, RTC, CAN (One bus with CAN FD)
- Pixel processing pipeline
- Peripheral cross-triggering
- Power management support for peripherals
- Dynamic clock scaling
- 8192 kB flash memory (64 kB reserved for recovery & EEPROM emulation)
- 2048 kB on the Teensy 4.0
- 1024 kB RAM
- 6 pins available for 10/100 Mbit Ethernet
- Micro SD Socket soldered onto board
- 42 breadboard-friendly I/O (c.f. 24 on Teensy 4.0)
- 2 USB ports (1 soldered)
- The Teensy 4.1 uses 5 pins with power management support, while the 4.0 has two pads for D+/D-
- Expansion ports for adding PSRAM or QSPI flash
- Provides power shut-off feature
- Solder a push button to the On/Off pin
- The 3.3V power supply can be disabled by holding the button for 5 seconds
- The 3.3V power supply can be turned on with a brief press
- If a coin cell is connected to VBAT, the RTC will continue to keep track of date and time while power is off
- All pins are rated to 3.3 V
Note: Details about add-ons, such as using Ethernet port or adding external memory, can be found on the store page.
The pinout for the Teensy 4.1 is available on the PJRC website. The board also ships with a handy printed reference card detailing the pinout of the board.
Teensy boards can be purchased both with and without header pins. When header pins are supplied, you can use the Teensy with a solderless breadboard. PJRC also sells sockets and headers, so you can always rework a pin-less Teensy dev board.
Programming the Board
All programming is done with the USB port – no need for in-circuit programming tools with this board. PJRC provides a tool called Teensy Loader which is used to program new software. A simple GUI is available for Mac, Linux, and Windows. Command line tools are also available for advanced users looking to integrate it with a continuous integration and testing system.
If you are using the Arduino IDE, the Teensy family can be flashed using the Arduino’s program button.
Teensyduino
PJRC’s Teensyduino software enables the Teensy family to be used with the Arduino environment. This makes the board an interesting starting point for beginners, while giving them the possibility to transition off of the Arduino platform without changing development hardware.
Teensyduino implements support for all standard Arduino SDK functions. PJRC states that most Arduino programs will work on the Teensy, and many Arduino libraries are also compatible. They maintain a list of compatible libraries.
The Teensy provides the same built-in peripherals that the Arduino does: analog inputs, SPI, I2C, PWM, and serial ports. The Teensyduino platform also supports multiple USB device types. You can change the Teensy’s USB type using the Tools -> USB Type menu in the Arduino IDE.
Documentation and Tutorials
PJRC provides a getting started guide, a Teensy tutorial, and reference documentation on their website. Reference documentation includes a schematic and all relevant datasheets.
For intermediate users, they also have a How-To section full of useful tips for interacting with the hardware. There is also a Code Library featuring source code for different USB device drivers.
If you need additional support, PJRC runs a forum where you can ask questions.
Purchasing
We like to support creators directly when possible, so we purchased the Teensy 4.1 directly from the PJRC web store for $26.85.
You can also find the boards at other popular electronics stores, such as SparkFun and Adafruit.
Your link to the PJRC store appears to be incorrect:
file:///Users/pjohnston/Desktop/%5Bhttps://www.pjrc.com/store/teensy41.html%5D(https://www.pjrc.com/store/teensy36.html)
Thank you, fixed it.
“while giving them the possibility to transition off of the Arduino platform without changing development hardware”
So if I don’t use the Teensy’s software framework at all, and even like, hypothetically, write all the firmware in Rust for whatever micro is on the Teensy?
I always thought that somehow, the magic chip on the Teensys that replace an ICP tool requires the Teensy framework to work. But I guess a hex file is a hex file…
Hey, maybe I’m wrong, but there’s certainly an NXP SDK for the chip, and you could feasibly write your own drivers and startup code (I mean… Paul did).
What’s the magic chip that replaced it? If you can talk over USB, you can talk to that bootloader and upload your images. https://github.com/PaulStoffregen/teensy_loader_cli
And now that you mention it, I think I will likely take a stab at such an effort for myself 🙂
Hmmm true… I was thinking of using my Teensys to play around with embedded Rust, sounds like it’s worth trying out. Thanks!
I’d be interested in learning how your stab goes! Keep us posted if you do decide to go for it please